
1. Github actions
Github actions简直是一个免费的计算资源,不好好好利用,简直是浪费
Github actions官方库:
1.1 如何创建一个release
1.1.1 Create relase
官方有个api:
https://docs.github.com/en/rest/releases/releases?apiVersion=2022-11-28#create-a-release
可以直接用github action库create-relase
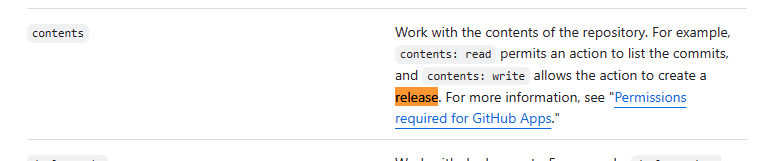
所以要加一个permission
参考如下:
yaml
on:
  workflow_dispatch:
name: create release
permissions:
  contents: write
jobs:
  build:
    name: Create Release
    runs-on: ubuntu-latest
    steps:
      - name: Checkout code
        uses: actions/checkout@v4

      - name: Create Release
        id: create_release
        uses: actions/create-release@v1
        env:
          GITHUB_TOKEN: ${{ secrets.GITHUB_TOKEN }} # This token is provided by Actions, you do not need to create your own token
        with:
          tag_name: ${{ github.run_number}}
          release_name: Release_${{ github.run_number}}
          body: |
            Changes in this Release
            - First Change
            - Second Change
          draft: false
prerelease: false1.1.2 Upload release asset
但这时还没有东西,只是把源码压缩了,不是最终的编译产物
需要用到另一个库upload-release-asset
流程就是在打包完后,先建立zip,再上传
yaml
- name: zip dist
    run: zip -r dist.zip blog/docs/.vitepress/dist/*

- name: Upload Release Asset
    id: upload-release-asset
    uses: actions/upload-release-asset@v1
    env:
      GITHUB_TOKEN: ${{ secrets.GITHUB_TOKEN }}
    with:
      upload_url: ${{ steps.create_release.outputs.upload_url }} # This pulls from the CREATE RELEASE step above, referencing it's ID to get its outputs object, which include a `upload_url`. See this blog post for more info: https://jasonet.co/posts/new-features-of-github-actions/#passing-data-to-future-steps
      asset_path: ./dist.zip
      asset_name: dist.zip
asset_content_type: application/zip2. github下载加速
目前发现比较好的是
https://gitmirror.com/files.html
只用在github地址前加个前缀即可
3. 同一电脑操作两个不同的github账号
3.1.1 为两个账号创建 SSH Key
text
ssh-keygen -t ed25519 -C "personal@example.com" -f "$env:USERPROFILE\.ssh\id_ed25519_github_personal"
ssh-keygen -t ed25519 -C "work@example.com" -f "$env:USERPROFILE\.ssh\id_ed25519_github_work"把两个 .pub 公钥分别添加到对应 GitHub 账号的 Settings > SSH and GPG keys。
3.1.2 配置 SSH 别名
编辑 C:\Users\zhangyuxin\.ssh\config:
text
Host github-personal
    HostName github.com
    User git
    IdentityFile ~/.ssh/id_ed25519_github_personal
    IdentitiesOnly yes

Host github-work
    HostName github.com
    User git
    IdentityFile ~/.ssh/id_ed25519_github_work
IdentitiesOnly yes测试:
text
ssh -T git@github-personal
ssh -T git@github-work3.1.3 每个仓库固定 SSH 账号
个人仓库:
text
git remote set-url origin git@github-personal:PERSONAL_USER/REPOSITORY.git
git config --local user.name "个人用户名"
git config --local user.email "个人邮箱"工作仓库:
text
git remote set-url origin git@github-work:ORGANIZATION/REPOSITORY.git
git config --local user.name "工作用户名"
git config --local user.email "工作邮箱"检查配置:
text
git remote -v
git config --local --list这样 git push、git pull 已经会固定使用对应账号。